![]()
Recently visited
Featured Projects
Web Applications
Links
Other Projects
- Chainsaw Bike
- STM32F429 LCD Example
- My PHP Content Managing System
- PHP image handler
- Flyback-transformer driver
- Atari Punk Console
- Teensy - ESP8266 - Interface
- Charging station
- 4-bit Adder
Meta
Interface the ESP8266 over the Teensy3.1
Jan 2015
In this tutorial I'll show you how to use the Teensy3.1 as an interface between the ESP8266 serial Wi-Fi module and your Mac. Though this tutorial uses the Mac as an example, but it will work on any platform if you use a different serial port software. This tutorial will use the Mac's built-in 'screen' command line tool.
The reason I like the Teensy3.1 is because it has more than one UART port. This is true for all Teensy versions, but only version 3.0 and 3.1 will work without level shifter, as the previous versions are 5V devices and the ESP8266 can only take 3.3V. They have a UART port for programming (and communicating with the computer) and a separate one to use freely (See this page for more).
A nice feature for beginners is that the Teensy can be programmed just like an Arduino, even in the same software environment (with an appropriate plugin).
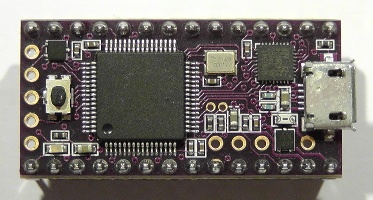 The Teensy 3.1 - OSHpark version (normally it's green)
The Teensy's program
These are the central features of the program:
- Forward all characters entered into 'screen' to the ESP8266
- For some unusual characters (such as # and $) macros are performed
The macro feature is the main reason why the Teensy-interface is more efficient than a standard USB-to-serial interface. With macros you can automate routines that would have to be typed, for example connecting to a Wi-Fi Access Point.
The source code is hosted in a repository on Github. Click here to view it.
At the end of a line of text, all you need to do is press the Enter key. You don't have to add a 'newline' character (using CTRL+J). The program does it all for you.
Setting up the 'screen' tool
The easiest way to communicate with anything over serial on the Mac is with the 'screen' command line tool. To use it, plug the Teensy into your Mac with the program already loaded onto it. It's best when the Teensy is the only USB device plugged in to your Mac. Now open Terminal and type "screen /dev/tty.usb" and then press the tab button. The command should auto-fill to something like "screen /dev/tty.usbmodem453811". Now press Enter. If you get a black screen with a white square cursor on the top left, then everything's going fine.
To test if the program is working correctly, take a wire and bridge the RX1 and TX1 pin of your Teensy. Type something. If you see it echoing in your Terminal, everything is going great.
Hooking up the ESP8266
Now we will wire up the ESP8266 to the Teensy (you can keep the Teensy plugged in and 'screen' running as long as you're careful).
- Pull up the ESP8266's CH_PD to 3.3V with a 10k resistor.
- Connect the ESP8266's RX pin to Teensy's TX1 pin.
- Connect the ESP8266's TX pin to Teensy's RX1 pin.
- Connect the ESP8266 to its own 3.3V power supply, as it pulls 300mA peak current and the Teensy's 3.3V regulated output can only handle 100mA.
If your terminal window spewed out some characters followed by a 'Ready', then everything works fine. If not, reset the ESP8266 by powering it down and back on again.
If you still get nothing:
- Recheck your wiring.
- Change the baud rate that Serial1 is initiated at. Try 56700 and 115200.
- Lastly, write me an email. Maybe I can help out.

 My wiring, click to enlarge
